How to integrate Visual Guard in WCF applications |
- Add the assemblies of Visual Guard as references of your project.
- Modify the "web.config" or the "app.config" file of your application to integrate the Visual Guard module.
- Integrate Visual Guard in the code of your application.
- Create a Visual Guard repository and declare your application by using the Visual Guard console. This repository will contain all security items (users, roles, permissions ...) of your application.
- Generate the Visual Guard configuration files by using the Visual Guard console. These configuration files will be needed to connect your application to the repository.
- Grant read/write permissions to the repository.
This demo shows how to integrate Visual Guard in WCF application:
In order to use Visual Guard, you must add references to Visual Guard assemblies:
- Opens the solution of your project in Visual Studio.
- In the solution explorer, expands the project node.
- Right-click the Project node for the project and select Add Reference from the shortcut menu.
-
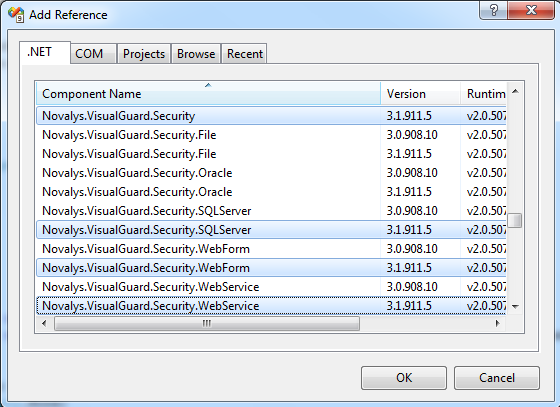
In .Net tab, select the 5 assemblies
- Novalys.VisualGuard.Security
- Novalys.VisualGuard.Security.WebForm
- Novalys.VisualGuard.Security.WebService
- Novalys.VisualGuard.Security.<RepositoryType> (Files, SQLServer or Oracle)
- Novalys.VisualGuard.Security.<ApplicationFrameworkType> (Depending on type of application's framework, whether .NetFramework or .NetCore)
In the list of assemblies, Visual Studio can display different versions of the Visual Guard assemblies. You must select the assembly corresponding to the version of the framework used in your project. |
You must add either Novalys.VisualGuard.Security.NetFramework or Novalys.VisualGuard.Security.Core (Depending on type of application's framework) |
Once the Visual Guard assemblies are referenced into project, you need to mark "Copy Local" property to "true" for each assembly. |
If the assemblies does not appear in this list you can use the Browse tab and select them in the directory <Visual Guard installation directory>/bin/2.0.
Description of Visual Guard assemblies:
- Novalys.VisualGuard.Security contains the main Visual Guard classes.
- Novalys.VisualGuard.Security.Files contains the classes needed to access to a file based repository.
- Novalys.VisualGuard.Security.SQLServer contains the classes needed to access to a repository stored in a Microsoft SQLServer database (SQLServer 2005 or higher). Available only in Visual Guard Enterprise Edition
- Novalys.VisualGuard.Security.Oracle contains the classes needed to access to a repository stored in an Oracle database (8i or higher). Available only in Visual Guard Enterprise Edition
- Novalys.VisualGuard.Security.WebService contains the classes needed to application hosting WCF services. You must reference this assembly in all project hosting WCF services that needs to be secure by Visual Guard.
- Novalys.VisualGuard.Security.NetFramework contains all classes required to support .Net Framework applications. This assembly is needed only if you want to integrate Visual Guard in .net framework applications.
- Novalys.VisualGuard.Security.Core contains all classes required to support .Net Core applications. This assembly is needed only if you want to integrate Visual Guard in .net core applications.
To enable Visual Guard in your application, you must declare and configure the section class <system.serviceModel> of your application hosting your WCF services. You can edit manually your application configuration file or use the Microsoft Service Configuration Editor (Right-click on your configuration file then select the option 'Edit WCF Configuration) .
The first step is to create a new service behavior. This behavior allows you to indicate how Visual Guard authenticates and authorizes a client to access to a service.
In Service Configuration Editor:
- Right-click on the 'Advanced>Service Behaviors' node in the tree view.
- Select the option 'New Service Behavior Configuration'.
- Change the name of the behavior (E.g.: VGSecurityBehavior).
In text editor:
<configuration>
  <system.serviceModel>
    ...
    <behaviors>
      <serviceBehaviors>
        <behavior name="VGSecurityBehavior">
          ...
        </behavior>
      </serviceBehaviors>
      ...
    </behaviors>
  </system.serviceModel>
</configuration>
Now, you have to add a serviceCredentials and serviceAuthorization elements to the service behavior
In Service Configuration Editor:
- Right-click on the service behavior node in the tree view.
- Select the option 'Add Behavior Element Extension'.
- Select serviceCredentials and serviceAuthorization elements then click ok.
In text editor:
  <configuration>
      <system.serviceModel>
        <behaviors>
         <serviceBehaviors>
                <behavior name="VGSecurityBehavior">
            <serviceCredentials>
            ...
            </serviceCredentials>
            <serviceAuthorization>
                      ...
            </serviceAuthorization>
          </behavior>
        </serviceBehaviors>
       </behaviors>
      </system.serviceModel>
</configuration>
- Change the value of UserNamePasswordValidationMode to Custom.
- Change the value of CustomUserNamePasswordValidatorType to 'Novalys.VisualGuard.Security.WebService.VGUserNameValidator, Novalys.VisualGuard.Security.WebService' .
In text editor:
<configuration>
  <system.serviceModel>
    <behaviors>
      <serviceBehaviors>
        <behavior name="VGSecurityBehavior">
          <serviceCredentials>
            <usernameAuthentication
                                                                                                                                                                                                                                                                                                                                                                                                                                                                                                                                                                                             userNamePasswordValidationMode="Custom"
               customUserNamePasswordValidatorType="Novalys.VisualGuard.Security.WebService.VGUserNameValidator, Novalys.VisualGuard.Security.WebService"
               cacheLogonTokens="true"
     />
          </serviceCredentials>
          <serviceAuthorization>
            ...
          </serviceAuthorization>
        </behavior>

      </serviceBehaviors>
    </behaviors>
  </system.serviceModel>
</configuration>
You can use your own authentication mechanism or any authentication mechanisms compatible with WCF (Windows account...) . In this case, you can edit your own configuration for the serviceCredentials element. Visual Guard will use the identity provided by WCF to check the access to the service.
Now you have to specify that the authorization access checking is provided by the Visual Guard. To do that, you must specify in the serviceAuthorization element that the PrincipalPermissionMode is 'Custom' and the ServiceAuthorizationManagerType is 'Novalys.VisualGuard.Security.WebService.VGServiceAuthorizationManager, Novalys.VisualGuard.Security.WebService'.
In Service Configuration Editor:
- Select the serviceAuthorization node in the tree view.
- Change the value of PrincipalPermissionMode to Custom.
- Change the value of ServiceAuthorizationManagerType to 'Novalys.VisualGuard.Security.WebService.VGServiceAuthorizationManager, Novalys.VisualGuard.Security.WebService' .
In text editor:
  <configuration>
    <system.serviceModel>
      <behaviors>
        <serviceBehaviors>
          <behavior name="VGSecurityBehavior">
              <serviceCredentials>
                  <usernameAuthentication
                              userNamePasswordValidationMode="Custom"
                              customUserNamePasswordValidatorType="Novalys.VisualGuard.Security.WebService.VGUserNameValidator,Novalys.VisualGuard.Security.WebService"
                              cacheLogonTokens="true" />
              </serviceCredentials>
              <serviceAuthorization
                     principalPermissionMode="Custom" serviceAuthorizationManagerType="Novalys.VisualGuard.Security.WebService.VGServiceAuthorizationManager, Novalys.VisualGuard.Security.WebService" />
          </behavior>
          </serviceBehaviors>
       </behaviors>
  </system.serviceModel>
</configuration>
The Visual Guard Service authorization manager will check the authorization access of the current identity. When the current identity is not allowed to access to the application (when the user account is not defined in the repository or is not a member of a role of the application), Visual Guard will reject the access to the service if anonymous session are not allowed. When anonymous session are allowed, the caller is authorized to access to the service and becomes a member of the Anonymous role.
You have to specify to all services requiring Visual Guard authentication and authorization mechanism the service behavior defined above.
In Service Configuration Editor:
- Select the node of the service to configure.
- Select the BehaviorConfiguration property in the right pane and specify the select the service behavior defined above (E.g.:).
In text editor:
  <configuration>
     <system.serviceModel>
      <services>
        <service behaviorConfiguration="VGSecurityBehavior" name="CalculatorService">
             <endpoint binding="wsHttpBinding"  contract="ICalculatorService" />
        </services>
    ....
    </system.serviceModel>
</configuration>
The main class in Visual Guard: Novalys.VisualGuard.SecurityVGSecurityManager This class provides the main access point for interacting with Visual Guard. It allows to set the security of the object of your application.
You have 3 types of code to integrate Visual Guard in your code:
- When you want to restrict the access of a service to a caller
- When you want to apply security actions on a WebService, a custom class or custom control, you must call Visual Guard to set the security of this object.
- When you want to check if a user has a specific permission or a specific role, in this case you can use VGSecurityManagerPrincipal
Visual Guard is compatible with the standard PrincipalPermissionAttribute class. This attribute will check whether a user is authenticated or is a member of a role. Visual Guard also provides its own attribute: Novalys.VisualGuard.SecurityVGPrincipalPermissionAttribute This attribute is similar as the standard PrincipalPermissionAttribute class and allows to check a Visual Guard role or aVisual Guard permission and does not requires
The following example demonstrates how to restrict access to the "Multiply" operation to caller with the permission "CanMultiply".
[VGPrincipalPermission(SecurityAction.Demand, Name="CanMultiply", Type=VGPermissionType.Permission)]
public double Multiply(double n1, double n2)
{
return  n1 * n2;
}
<VGPrincipalPermission(SecurityAction.Demand, Name:="CanMultiply", Type="VGPermissionType.Permission")> _
Public Function Multiply(Double n1, Double n2) As Double
    Return n1 * n2
End Function
If you need to apply Visual Guard security actions on object of your application, you will need to call Visual Guard to set the security of the object. To do that, you must:
- Add the Novalys.VisualGuard.SecurityVGISecurable interface to your class.
- Add the call to the SetSecurity method at the end of the constructor.
If you want to understand how Visual Guard applies the security to the objects of your application, see How Visual Guard secures an application.
The following code show how to secure the Calculator class that implement the ICalculator service contract:
 public class Calculator : ICalculator, VGISecurable
 {
      public Calculator()
      {
            // ....
            // Initialization of the object
            // ....

            // This call will indicates to Visual Guard that the class must be secured.
            VGSecurityManager.SetSecurity(this);
       }
       public double Multiply(double n1, double n2)
       {
            return n1 * n2;
       }
}
Public Class Calculator Implemenents ICalculator, VGISecurable
    Private Sub New()
        ' ...
        ' Initialization of the object
        ' ...

        ' This call will indicates to Visual Guard that the class
        must be secured.

        VGSecurityManager.SetSecurity(Me)
    End Sub
    Public Function Multiply(ByVal n1 as Double, ByVal n2 as  Double) As Double
        Return n1 * n2;
    End Function
End Class
If a user has more than one role, by default, Visual Guard creates a permission sets that will be a union of all permission sets granted to these roles. If you want to select only one role or filter roles granted to the user, you can handle the event VGSecurityManagerPermissionsLoading
The following example demonstrates how to select the role Administrator if this role is granted:
 Sub VGSecurityManager_PermissionLoading(ByVal sender As Object, ByVal e As VGPermissionsLoadingEventArgs)
     If e.Roles.Length > 1 Then
         Dim selectedRoles(1) As Novalys.VisualGuard.Security.VGGrantedRole
         For Each role As Novalys.VisualGuard.Security.VGGrantedRole In e.Roles
           If role.Name = "Administrator" Then
               selectedRoles(0) = role
               Exit For
           Else
              If role.Name = "Member" Then
                 selectedRoles(0) = role
                 Exit For
             End If
           End If
     Next
     If selectedRoles(0) Is Nothing Then
         e.Status = Novalys.VisualGuard.Security.VGAuthorizationStatus.ProcessCanceled
     Else
         e.Roles = selectedRoles
     End If
  End If
End Sub
void VGSecurityManager_PermissionLoading(object sender, VGPermissionsLoadingEventArgs args)
{
    if (e.Roles.Length > 1)
    {
        Novalys.VisualGuard.Security.VGGrantedRole[] selectedRoles = new Novalys.VisualGuard.Security.VGGrantedRole[1];
        foreach (Novalys.VisualGuard.Security.VGGrantedRole role in e.Roles)
        {
            if (role.Name == "Administrator")
            {
                selectedRoles[0] = role;
                break;
            }
            else if (role.Name == "Member")
            {
                selectedRoles[0] = role;
                break;
            }
         }

         if (selectedRoles[0] == null)
         {
             e.Status = Novalys.VisualGuard.Security.VGAuthorizationStatus.ProcessCanceled;
         }
         else
         {
             e.Roles = selectedRoles;
         }
    }
 }
Visual Guard needs to Read/Write permissions to access to the repository. For example, for a file based repository you must grant "Modify" permission to the directory containing the repository for ASP.NET user accounts. For a repository stored in a database, the user used to access to the Visual Guard repository database must be a member of "vg_BasicAccess" role.
In most of case, you must grant this permission to "MACHINE\ASPNET" user account. If you use IIS 6.0 on Windows Server 2003 the user account is "NT Authority\Network Service". If you use impersonation, you must grant permission to "MACHINE\IUSR_<MACHINE>" for Form authentication mode and "Domain\UserName" for Windows integrated authentication mode.
To change permission to a directory, you must:
- Open the Explorer.
- Right click the directory containing the repository data then select the menu "Properties".
- In the "Security" tab, click on the "Add" button and select the user for which you want to grant the permission (i.e. MACHINE\ASPNET) then click ok.
- In the list of permissions, click the option "Modify" then click on the "OK" button.