How to secure Crystal report with Visual Guard |
- Add the assemblies of Visual Guard as references of your project.
- Integrate Visual Guard in the code of your application.
- Create a Visual Guard repository and declare your application by using the Visual Guard console. This repository will contain all security items (users, roles, permissions ...) of your application.
- Generate the Visual Guard configuration files by using the Visual Guard console. These configuration files will be needed to connect your application to the repository.
- Grant read/write permissions to the repository.
In order to use Visual Guard, you must add references to Visual Guard assemblies:
- Opens the solution of your project in Visual Studio.
- In the solution explorer, expands the project node.
- Right-click the Project node for the project and select Add Reference from the shortcut menu.
-
In .Net tab, select the 4 assemblies
- Novalys.VisualGuard.Security
- Novalys.VisualGuard.Security.<ProjectType> (WinForm, ASP.net),
- Novalys.VisualGuard.Security.<RepositoryType> (Files, SQLServer or Oracle)
- Novalys.VisualGuard.Security.<ApplicationFrameworkType> (Depending on type of application's framework, whether .NetFramework or .NetCore)
In the list of assemblies, Visual Studio can display different versions of the Visual Guard assemblies. You must select the assembly corresponding to the version of the framework used in your project. |
You must add either Novalys.VisualGuard.Security.NetFramework or Novalys.VisualGuard.Security.Core (Depending on type of application's framework) |
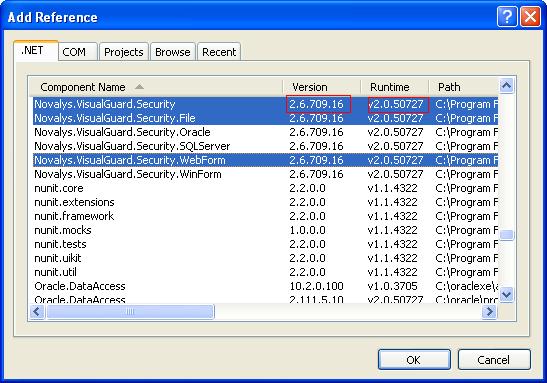
If the assemblies does not appear in this list you can use the Browse tab and select them in the directory <Visual Guard installation directory>/bin/3.1
Description of Visual Guard assemblies:
- Novalys.VisualGuard.Security contains the main Visual Guard classes.
- Novalys.VisualGuard.Security.Files contains the classes needed to access to a file based repository.
- Novalys.VisualGuard.Security.SQLServer contains the classes needed to access to a repository stored in a Microsoft SQLServer database (SQLServer 2000 or higher). Available only in Visual Guard Enterprise Edition
- Novalys.VisualGuard.Security.Oracle contains the classes needed to access to a repository stored in an Oracle database (8i or higher). Available only in Visual Guard Enterprise Edition
- Novalys.VisualGuard.Security.WebForm contains the classes needed to ASP.Net application. You must reference this assembly in ASP.Net WebSite or ASP.Net WebService project.
- Novalys.VisualGuard.Security.WinForm contains all classes based on WinForm control. This assembly is needed only if you use the forms provided by Visual Guard to authenticate, change a password or select a role. If you want to use your own form you do not need to add a reference to this assembly.
- Novalys.VisualGuard.Security.NetFramework contains all classes required to support .Net Framework applications. This assembly is needed only if you want to integrate Visual Guard in .net framework applications.
- Novalys.VisualGuard.Security.Core contains all classes required to support .Net Core applications. This assembly is needed only if you want to integrate Visual Guard in .net core applications.
To know how to add Visual Guard in WinForm project see: How to integrate Visual Guard in a WinForm application
To know how to add Visual Guard in ASP.Net project see: How to integrate Visual Guard in ASP.Net Web Site
To filter data in a report Crystal report you have to:
- Create parameters in your report,
- Filter data with the parameter in your report,
- Create a property to initialise your user name,
- Intialise the parameter of the report with the property,
- Create a permissions in Visual Guard.
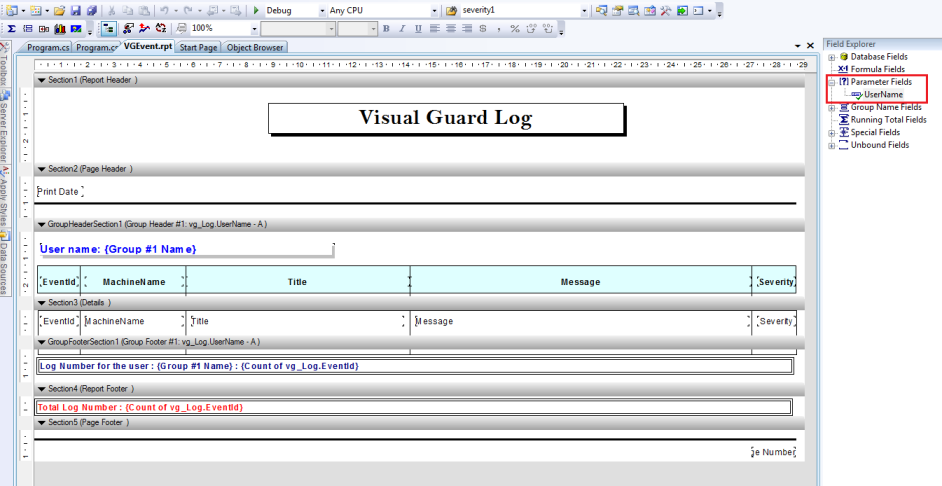
To create a paremeter in your report:
- Open the report,
- Right click in "Parameters Fileds",
- Click on "New",
- Enter "Parameter name", "Description" and select "Value Type",
- Select "Discrete Value",
- Click on "Ok".
To filter your report :
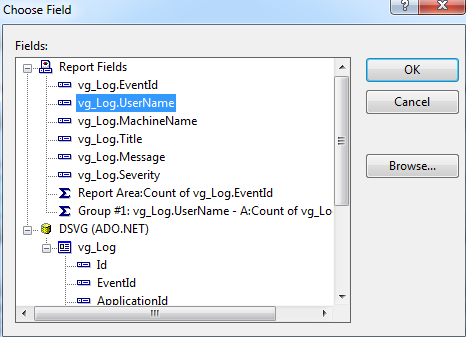
- Click on "Crystal report/ report/ Select expert",
- Select the filed you want to filter,
- Click on "Ok",
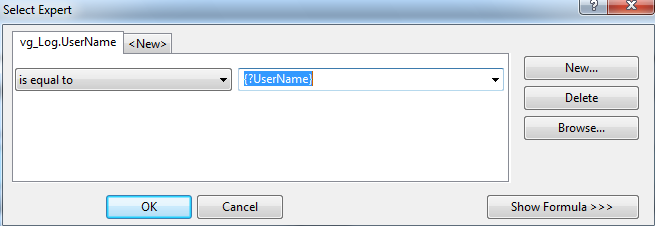
- In your select field, select "is equal to",
- In the drop dow list on the right select the parameter,
- Click on "Ok".
In your form with the report viewer, create a property.
public string User { get; set; }
In your form with the report viewer .
private void Form1_Load(object sender, EventArgs e)
{
    SqlConnection SQLCon = new SqlConnection(Properties.Settings.Default.visualguarddb_NBAConnectionString);
    try
    {

        SQLCon.Open();

        DSVG ds = new DSVG();
                                SqlDataAdapter ada = new SqlDataAdapter("select * from VG_Log", SQLCon);
        ada.Fill(ds, "VG_Log");


        //Create a parameter
        ParameterFields pfields = new ParameterFields();
        ParameterField pfield = new .ParameterField();
        ParameterDiscreteValue disvalue = new ParameterDiscreteValue();


        // Parameter Name
        pfield.Name = "UserName";

        // Iniatialise the Parameter Value
        disvalue.Value = User;/initialise the parameter with the valuean>
        pfield.CurrentValues.Add(disvalue);

        //Add the parameter in the list of parameters
        pfields.Add(pfield);

        //Add the parameters list in the ParameterFieldInfo of the report viewer
        crystalReportViewer1.ParameterFieldInfo = pfields;

        vgEventReport.SetDataSource(ds);

        crystalReportViewer1.ReportSource = vgEventReport;

    }
    catch (Exception)
    {
        throw;
    }
    finally
    {
        SQLCon.Close();
    }
}
- Open Visual Guard Console,
- Select your application,
- Create a new Permission (cf: Create a new Permission in the documentation "Visual Guard Win Console"),
- Create a new Argument on the permission (cf: Edit Argument list in the documentaion "Visual Guard Win Console"),
- Create a property action (cf:Properties actions in the documentation "Visual Guard Console"),
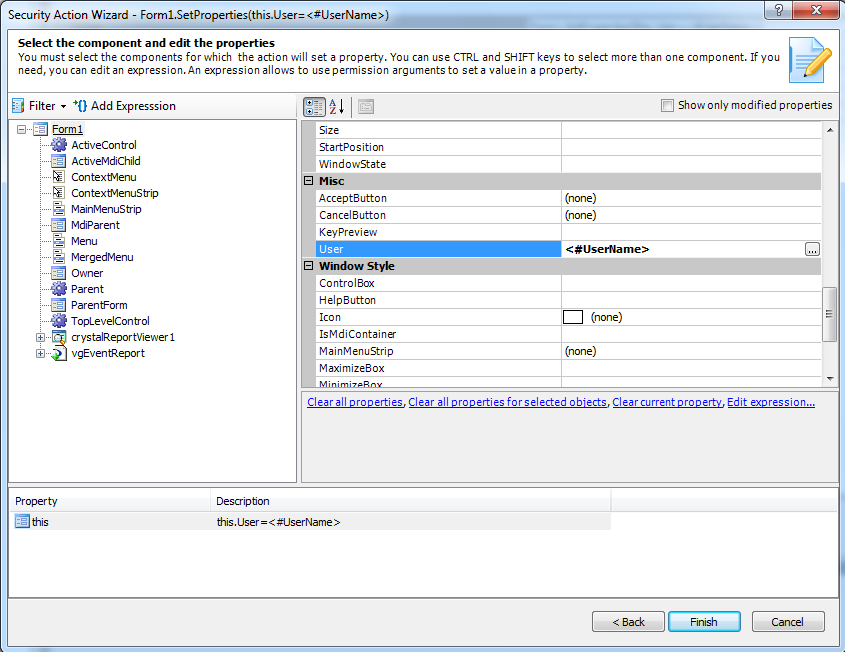
- Select the form where you create the property,
- Select your property in the property grid (user),
- Click on "add Expression",
- Select " Current UserName",
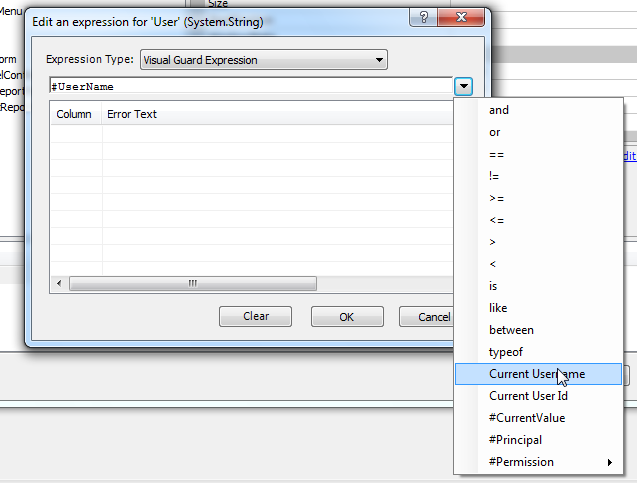
- Click on "Ok",
- Click on "Finish".
Now when you execute your application, the report is filter with the connected user.