Visual Guardallows you to add Windows user accounts.
Note:
You will be allowed to access the user accounts only if you have been assigned the privilege. Refer special roles section for more details on privilege
Follow the steps below to create a Windows User:
Login to the Repository under which user account(s) is to be created.
Screen Display
Select the Add Windows User or Group menu using one of the options below:
Right click on the Repository Name provided on the Left Navigation Panel and select Add Windows User or Group menu.
OR
Right click on the Repository > Users menu provided on the Left Navigation Panel and select Add Windows User or Group menu (A).
OR
Select the Repository from Left Navigation Panel and select the Add Windows User or Groupmenu from ActionMenu(B).
The Add Windows User or Groupscreen will be displayed as shown below:
Screen Display
Click (A) to select the Object Type. Object Types screen will be displayed.
Screen Display
You can select all or any one of the options available in the Object Types screen.
Click to accept the selection. The selected options will be displayed in 'Select this object type' (A) field on Select Users or Groups screen.
Screen
Display
Select the location where the object type is located by clicking (B). Locations screen will be displayed as below:
Screen Display
The list of all Domains, SubDomains, and Groups etc available on your network will be displayed.
Accept the selection by clicking . The selected location will be displayed in 'From thislocation' field on Select Users or Groups screen.
Click to discard the selection.
Screen Display
Enter the object name in 'Enter the object name to select' field (A). You can view examples of allowed object names by clicking on examples link (B).
You can also search for object names by clicking . The system will allow searching name in the selected location.
The name of the selected user will be listed as shown below:
Screen Display
You can click to perform advanced search.
Click to select the selected user. You can discard the selection by clicking .
Note:
and will only be active if any name has been specified in the 'Enter the object name to select' field.
Once the selection is complete, the system will allow you to grant roles for the selected repository.
Screen Display
The selected object name will be displayed; you can alter the name by clicking (A).
The list of roles available for allocation will be displayed in the List of Roles section (B).
You can grant one role at a time. When role (C) is selected, (D) will be enabled.
Screen Display
Click , the granted role will be displayed in Current role section (E).
Screen Display
You can remove the role by selecting the role from Current roles list.
Click to remove the role. The removed role will again be available in List of roles (F).
Screen Display
Click to save the roles and user type or click to discard the changes.
The new user account (A) will be displayed in the Grid on Right side.
Screen Display
The Windows user, when created are displayed with a separate icon i.e. and if a role is been assigned to these users apart from default role then the icon will be
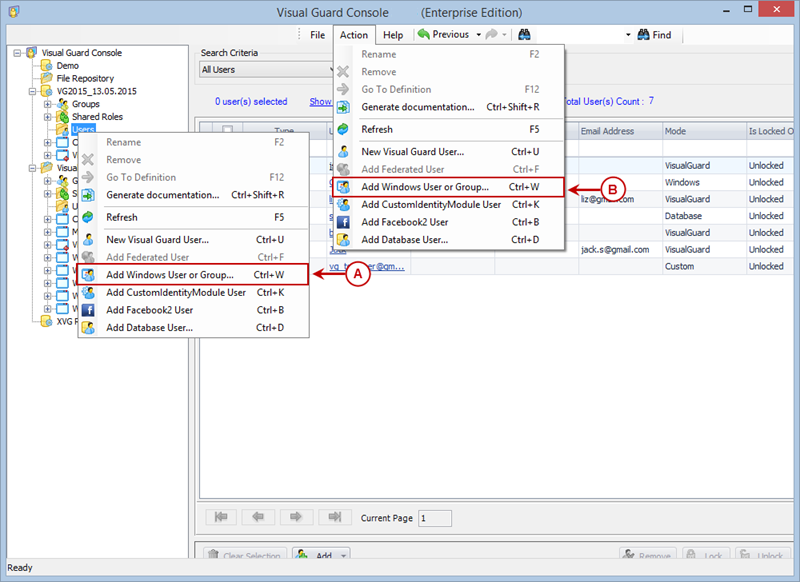
An entity, such as a file, folder, shared folder, printer, or Active Directory object, described by a distinct, named set of attributes. For example, the attributes of a File object include its name, location, and size; the attributes of an Active Directory User object might include the user's first name, last name, and e-mail address.